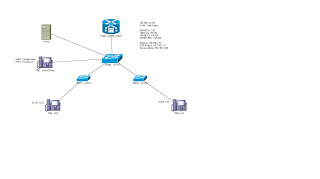
First up is going to be setting up the actual lab. Here is our network diagram:

I'm going to build this network from the ground up. People could probably argue that it is smarter to do it the other way around, but I prefer to take my time with the little annoying things first so I can focus on the big picture later down the road.
With that in mind, Physical cabling takes place first. You can look at the diagram for that, there is not to much going on. Next let's start with our ALSW1. I use a 2900XL for this.
Basic Configs:
hostname ALSW1
interface VLAN99
ip address 192.168.1.51 255.255.255.192
ip default-gateway 192.168.1.1
line vty 0 15
login local
__
After you do that, ping your 192.168.1.51 interface to make sure it is up. Make sure you no-shut it.
Trunking:
interface FastEthernet0/1
switchport trunk encapsulation dot1q
switchport trunk native vlan 99
switchport mode trunk
Make sure you no-shut it as well.
___
7906 configuration:
interface FastEthernet0/9
switchport access vlan 10
switchport voice vlan 20
NOTE: My IOS does not support the access vlan and voice vlan, so on my 2900's I had to configure it like this:
interface FastEthernet0/9
switchport trunk encapsulation dot1q
switchport trunk native vlan 20
switchport trunk allowed vlan 1,10,20,1002-1005
switchport mode trunk
The 3500 is a similar issue, but slightly different. I'll approach that in a moment.
That should do it for ALSW1, ALSW2 is very similar, with the diferences in:
interface VLAN99
ip address 192.168.1.52 255.255.255.192
no ip directed-broadcast
no ip route-cache
ip default-gateway 192.168.1.1
line vty 0 15
login local
The rest is the same.
NOTE:
Don't forget to make a username and password for yourself. I used this:
username chris privilege 15 password 0 cisco
___
Now for the DLSW:
interface VLAN99
ip address 192.168.1.50 255.255.255.192
no ip directed-broadcast
no ip route-cache
ip default-gateway 192.168.1.1
line vty 0 15
login local
___
Trunking:
interface FastEthernet0/1
switchport trunk encapsulation dot1q
switchport trunk native vlan 99
switchport mode trunk
interface FastEthernet0/3
switchport trunk encapsulation dot1q
switchport trunk native vlan 99
switchport mode trunk
interface FastEthernet0/4
switchport trunk encapsulation dot1q
switchport trunk native vlan 99
switchport mode trunk
___
Server and Phone:
interface FastEthernet0/24
switchport access vlan 30
interface FastEthernet0/13
switchport access vlan 10
switchport voice vlan 20
NOTE: With this, I had to use the following configs since my 3500 didnt support access and voice vlans properly:
interface FastEthernet0/13
switchport trunk encapsulation dot1q
switchport trunk native vlan 10 (data VLAN)
switchport trunk allowed vlan 1,10,20,1002-1005
switchport mode trunk
Again, don't forget to make a username and password.
___
Now for the fun one, the CUCME Router. The first think I like to configure is the DHCP Server. Start by picking your excluded addresses:
ip dhcp excluded-address 192.168.1.1
ip dhcp excluded-address 192.168.1.65
ip dhcp excluded-address 192.168.1.129
ip dhcp excluded-address 192.168.1.193
ip dhcp excluded-address 192.168.1.200
Then create your pools:
ip dhcp pool MGNT
network 192.168.1.0 255.255.255.192
default-router 192.168.1.1
!
ip dhcp pool DATA
network 192.168.1.64 255.255.255.192
default-router 192.168.1.65
!
ip dhcp pool VOICE
network 192.168.1.128 255.255.255.192
default-router 192.168.1.129
option 150 ip 192.168.1.129
!
ip dhcp pool SERVER
network 192.168.1.192 255.255.255.192
default-router 192.168.1.193
NOTE: Don't forget your option 150 for your voice dhcp pool, as this router is also the TFTP server with the CNF files and firmware.
Next, I configure router on a stick, but I keep it shutdown:
interface FastEthernet0/0
no ip address
!
interface FastEthernet0/0.10
encapsulation dot1Q 10
ip address 192.168.1.65 255.255.255.192
!
interface FastEthernet0/0.20
encapsulation dot1Q 20
ip address 192.168.1.129 255.255.255.192
!
interface FastEthernet0/0.30
encapsulation dot1Q 30
ip address 192.168.1.193 255.255.255.192
!
interface FastEthernet0/0.99
encapsulation dot1Q 99 native
ip address 192.168.1.1 255.255.255.192
you will need to upload your CME files and firmware if you have not done so already, do this with the archive command:
archive tar /xtract tftp://ipadd flash:
Once that is done, we can start to configure our telephony service.
telephony-service
max-ephones 10
max-dn 10
ip source-address 192.168.1.129 port 2000
auto assign 1 to 10
system message CIPCES Lab
max-conferences 4 gain -6
transfer-system full-consult
Now, I would configure the tftp server and the load files:
Since I used 7906 phones and a 7960, this is what mine looked like:
tftp-server flash:phone/7906-7911/apps11.8-3-2-27.sbn alias apps11.8-3-2-27.sbn
tftp-server flash:phone/7906-7911/cnu11.8-3-2-27.sbn alias cnu11.8-3-2-27.sbn
tftp-server flash:phone/7906-7911/cvm11sccp.8-3-2-27.sbn alias cvm11sccp.8-3-2-27.sbn
tftp-server flash:phone/7906-7911/dsp11.8-3-2-27.sbn alias dsp11.8-3-2-27.sbn
tftp-server flash:phone/7906-7911/jar11sccp.8-3-2-27.sbn alias jar11sccp.8-3-2-27.sbn
tftp-server flash:phone/7906-7911/SCCP11.8-3-3S.loads alias SCCP11.8-3-3S.loads
tftp-server flash:phone/7906-7911/term06.default.loads alias term06.default.loads
tftp-server flash:phone/7906-7911/term11.default.loads alias term11.default.loads
tftp-server flash:phone/7940-7960/P00308000500.bin alias P00308000500.bin
tftp-server flash:phone/7940-7960/P00308000500.loads alias P00308000500.loads
tftp-server flash:phone/7940-7960/P00308000500.sb2 alias P00308000500.sb2
tftp-server flash:phone/7940-7960/P00308000500.sbn alias P00308000500.sbn
telephony-service
load 7960-7940 phone/7940-7960/P00308000500
load 7906 phone/7906-7911/SCCP11.8-3-3
Then I would create all of the phones and ephone DN's:
ephone-dn 1 dual-line
number 1000
label Control Room - 1000
description Control Room
name Control Room
!
!
ephone-dn 2 dual-line
number 1100
label CEO - 1100
description CEO
name CEO
!
!
ephone-dn 3 dual-line
number 1200
label CIO - 1200
description CIO
name CIO
!
!
ephone-dn 4 dual-line
number 1001
label Emergency - 1001
name Emergency
!
!
ephone-dn 5 dual-line
number 1002
label Aux - 1002
name Aux
!
!
ephone-dn 6 dual-line
number 1003
label Chris Morin - 1003
name Chris Morin
!
Then grab the MAC's off the phone, since we don't have very many its not to hard to pre-configure everything:
ephone 1
mac-address 000B.46A0.8356
type 7960
button 1:1 2:4 3:5 4:6
!
!
!
ephone 2
mac-address 001D.A267.43E9
type 7906
button 1:2
!
!
!
ephone 3
mac-address 001D.A267.45E4
type 7906
button 1:3
Give yourself an NTP server:
ntp server 192.168.1.1 version 1 prefer
Almost there, create your CNF Files:
create cnf-files
Then no-shut your fa0/0 interface, and watch the phones start to register. I hope I didn't miss any steps. Next post will grow from this, so you all have fun with it!

No comments:
Post a Comment