Thursday, September 30, 2010
Wednesday, September 29, 2010
Use Outlook Rules to Prevent "Oh No!" After Sending Emails
How many times have you sent an email and then realized a few seconds later that your snarky comment was sent to the entire mailing list, or left an embarrassing typo in an email to somebody you were trying to impress?
Select Rules and Alerts from the Tools menu, and then click on the New Rule button.

Under “Start from a blank rule”, choose Check messages after sending, and then click Next.

Click the Next button again on the “Which conditions do you want to check” screen, and you’ll be prompted with this dialog informing you that the rule will apply to all messages. If you want to, you can set this rule up to only work for certain groups.

On the next screen, check the box for “defer delivery by a number of minutes”, and then click on “a number of” and change the defer minutes to something like 5 minutes, although you can change it to whatever you’d like.
I originally tried using a 1 minute delay, but it didn’t give me enough time to realize the mistake and then locate the message and fix the problem.

Click the Next button, and then give the rule a name, preferably something memorable so you’ll recognize it in the list.

Now when you send messages, you’ll notice that they sit in the Outbox for a few minutes. If you want to stop a message from going out, your best bet is to just delete it from the Outbox, but you could attempt to just fix the mistake and then resend.
Monday, September 27, 2010
General Cisco Security
There are several general configuration items that should be configured on all Cisco devices running standard IOS. Some layer2 only switches will ignore a few of the commands in this article that are layer3 specific.
The first place to start is with the service commands
service password-encryption
Explanation:
The router administrator will ensure passwords are not viewable when displaying the router configuration. Type 5 encryption must be used for the enable mode password.
no service udp-small-servers
no service tcp-small-servers
Explanation:
All IOS versions above 12.0 has small-servers disabled by default. However, it is good to make sure these services didn’t get enabled somewhere along the way. The commands above won’t show up in the configuration, since they are off by default. Cisco IOS provides these “small services” which include echo, chargen, and discard. These services are completely unnecessary to run on Cisco devices.
no service pad
Explanation:
Packet Assembler Disassembler (PAD) is an X.25 component that is seldom used. PAD acts like a multiplexer for the terminals. If enabled, it can render the device open to attacks.
service tcp-keepalives-in
Explanation:
Idle logged-in telnet sessions can be susceptible to unauthorized access and hijacking attacks. By default, routers do not continually test whether a previously connected TCP endpoint is still reachable. If one end of a TCP connection idles out or terminates abnormally, the opposite end of the connection may still believe the session is available. These “orphaned” sessions use up valuable router resources and can also be hijacked by an attacker. To mitigate this risk, routers must be configured to send periodic keep-alive messages to check that the remote end of a session is still connected. If the remote device fails to respond to the keep-alive message, the sending router will clear the connection and free resources allocated to the session.
no service finger
Explanation:
The IOS finger service supports the UNIX finger protocol, which is used for querying a host about the users that are logged on. This would give potential attackers a head start by providing valid usernames for the device.
no boot network
no service config
Explanation:
The routers can find their startup configuration either in their own NVRAM or load it over the network via TFTP or Remote Copy (rcp). Obviously, loading in from the network is taking a security risk. If the startup configuration was intercepted by an attacker, it could be used to either gain access to the router.
Next, let’s take a look at the various server services available in IOS.
no ip http-server
no ip ftp-server
no ip tftp-server
Explanation:
The services listed above are extremely insecure and serve very little useful purpose. An ftp-server or tftp-server might be used in environments where you have one device that has a software image on it that you want to distribute to other reachable devices. These other devices might not have connectivity to a centralized distribution server that would host images for software upgrades, therefore making it convenient to use a router in order to get the job done. If these services are used, it should only be in a temporary capacity and need to be disabled before logging out of the device.
no ip bootp server
Explanation:
Bootp is a user datagram protocol (UDP) that can be used by Cisco routers to access copies of Cisco IOS Software on another Cisco router running the Bootp service. In this scenario, one Cisco router acts as a Cisco IOS Software server that can download the software to other Cisco routers acting as Bootp clients. In reality, this service is rarely used and can allow an attacker to download a copy of a routers Cisco IOS Software.
no ip source-route
Explanation:
Source routing is a feature of IP, whereby, individual packets can specify routes. This feature is used in several different network attacks. The router should always control how traffic is routed as apposed to be told to trust a path that is provided from another source.
Saturday, September 25, 2010
My Architect
http://www.jagermeister.com/?AR=1#/int-en/downloads
http://mrdoob.com/lab/actionscript/pv3d/architect/
http://mrdoob.com/lab/actionscript/pv3d/architect/
Interview Questions for Check Point Firewall Technology
Question 1 – Which of the applications in Check Point technology can be used to configure security objects?
Answer:
SmartDashboard
SmartDashboard
Question 2 – Which of the applications in Check Point technology can be used to view who and what the administrator do to the security policy?
Answer:
SmartView Tracker
Answer:
SmartView Tracker
Question 3 – What are the two types of Check Point NG licenses?
Answer:
Central and Local licenses
Central licenses are the new licensing model for NG and are bound to the SmartCenter server. Local licenses are the legacy licensing model and are bound to the enforcement module.
Answer:
Central and Local licenses
Central licenses are the new licensing model for NG and are bound to the SmartCenter server. Local licenses are the legacy licensing model and are bound to the enforcement module.
Question 4 – What is the main different between cpstop/cpstart and fwstop/fwstart?
Answer:
Using cpstop and then cpstart will restart all Check Point components, including the SVN foundation. Using fwstop and then fwstart will only restart VPN-1/FireWall-1.
Answer:
Using cpstop and then cpstart will restart all Check Point components, including the SVN foundation. Using fwstop and then fwstart will only restart VPN-1/FireWall-1.
Question 5 – What are the functions of CPD, FWM, and FWD processes?
Answer:
CPD – CPD is a high in the hierarchichal chain and helps to execute many services, such as Secure
Internal Communcation (SIC), Licensing and status report.
FWM – The FWM process is responsible for the execution of the database activities of the
SmartCenter server. It is; therefore, responsible for Policy installation, Management High
Availability (HA) Synchronization, saving the Policy, Database Read/Write action, Log
Display, etc.
FWD – The FWD process is responsible for logging. It is executed in relation to logging, Security
Servers and communication with OPSEC applications.
Question 6 – How to Install Checkpoint Firewall NGX on SecurePlatform?
Answer:
1. Insert the Checkpoint CD into the computers CD Drive.
Answer:
1. Insert the Checkpoint CD into the computers CD Drive.
2. You will see a Welcome to Checkpoint SecurePlatform screen. It will prompt you to press any key. Press any key to start the installation,otherwise it will abort the installation.
3.You will now receive a message saying that your hardware was scanned and found suitable for installing secureplatform. Do you wish to proceed with the installation of Checkpoint SecurePlatform.
Of the four options given, select OK, to continue.
4.You will be given a choice of these two:
SecurePlatform
SecurePlatform Pro
SecurePlatform Pro
Select Secureplatform Pro and enter ok to continue.
5.Next it will give you the option to select the keyboard type. Select your Keyboard type (default is US) and enter OK to continue.
6.The next option is the Networking Device. It will give you the interfaces of your machine and you can select the interface of your choice.
7.The next option is the Network Interface Configuration. Enter the IP address, subnet mask and the default gateway.
For this tutorial, we will set this IP address as 1.1.1.1 255.255.255.0 and the default gateway as 1.1.1.2 which will be the IP address of your upstream router or Layer 3 device.
8.The next option is the HTTPS Server Configuration. Leave the default and enter OK.
9.Now you will see the Confirmation screen. It will say that the next stage of the installation process will format your hard drives. Press OK to Continue.
10.Sit back and relax as the hard disk is formated and the files are being copied.
Once it is done with the formatting and copying of image files, it will prompt you reboot the machine and importantly REMOVE THE INSTALLATION CD. Press Enter to Reboot.
Note: Secureplatform disables your Num Lock by over riding System BIOS settings, so you press Num LOck to enable your Num Lock.
For the FIRST Time Login, the login name is admin and the password is also admin.
11.Start the firewall in Normal Mode.
12.Configuring Initial Login:
Enter the user name and password as admin, admin.
It will prompt you for a new password. Chose a password.
Enter new password: check$123
Enter new password again: check$123
Enter new password again: check$123
You may choose a different user name:
Enter a user name:fwadmin
Now it will prompt you with the [cpmodule]# prompt.
13. The next step is to launch the configuration wizard. To start the configuration wizard, type “sysconfig”.
You have to enter n for next and q for Quit. Enter n for next.
14.Configuring Host name: Press 1 to enter a host name. Press 1 again to set the host name.
Enter host name: checkpointfw
You can either enter an ip address of leave it blank to associate an IP address with this hostname. Leave it blank for now.
You can either enter an ip address of leave it blank to associate an IP address with this hostname. Leave it blank for now.
Press 2 to show host name. It now displays the name of the firewall as checkpointfw.
Press e to get out of that section.
15.Configuring the Domain name.
Press 2 to enter the config mode for configuring the domain mode. Press 1 to set the domain name.
Enter domain name:yourdomain.com
Example:
Enter domain name: checkpointfw.com
You can press 2 to show the domain name.
16. Configuring Domain Name Servers.
You can press 1 to add a new domain name server.
Enter IP Address of the domain name srever to add: Enter your domain name server IP Address HERE.
Press e to exit.
Network Connections.
17. Press 4 to enter the Network Connections parameter.
Enter 2 to Configure a new connection.
Your Choice:
1) eth0
2) eth1
3) eth2
4) eth3
2) eth1
3) eth2
4) eth3
Press 2 to configure eth1. (We will configure this interface as the inside interface with an IP address of 192.168.1.1 and a subnet mask of 255.255.255.0. The default gateway will be configured as 1.1.1.1.)
Press 1) Change IP settings.
Enter IP address for eth1 (press c to cancel): 192.168.1.1
Enter network Mask for interface eth2 (press c to cancel): 255.255.255.0
Enter broadcast address of the interface eth2 (leave empty for default): Enter
Enter network Mask for interface eth2 (press c to cancel): 255.255.255.0
Enter broadcast address of the interface eth2 (leave empty for default): Enter
Pres Enter to continue….
Similarly configure the eth2 interface, which will be acting as a DMZ in this case with 10.10.10.1 255.255.255.0.
Press e to exit the configuration menu.
18.Configuring the Default Gateway Configuration.
Enter 5 which is the Routing section to enter information on the default gateway configuration.
1.Set default gateway.
2.Show default gateway.
2.Show default gateway.
Press 1 to enter the default gateway configuration.
Enter default gateway IP address: 1.1.1.2
19. Choose a time and date configuration item.
Press n to configure the timezone, date and local time.
This part is self explanatory so you can do it yourself.
The next prompt is the Import Checkpoint Products Configuration. You can n for next to skip this part as it is not needed for fresh installs.
20. Next is the license agreement.You have the option of V for evaluation product, U for purchased product and N for next. If you enter n for next. Press n for next.
Press Y and accept the license agreement.
21.The next section would show you the product Selection and Installation option menu.
Select Checkpoint Enterprise/Pro.
Press N to continue.
22. Select New Installation from the menu.
Press N to continue.
23. Next menu would show you the products to be installed.
Since this is a standalone installation configuration example, select
VPN Pro and
Smartcenter
Smartcenter
Press N for next
24.Next menu gives you the option to select the Smartcenter type you would like to install.
Select Primary Smartcenter.
Press n for next.
A validation screen will be seen showing the following products:
VPN-1 Pro and Primary Smartcenter.
Press n for next to continue.
Now the installation of VPN-1 Pro NGX R60 will start.
25. The set of menu is as follows:
Do you want to add license (y/n)
You can enter Y which is the default and enter your license information.
26. The next prompt will ask you to add an administrator. You can add an administrator.
27.The next prompt will ask you to add a GUI Client. Enter the IP Address of the machine from where you want to manage this firewall.
28. The final process of installation is creation of the ICA. It will promtp you for the creation of the ICA and follow the steps. The ICA will be created. Once the random is configured ( you dont have to do anything), the ICA is initialized.
After the ICA initialized, the fingerprint is displayed. You can save this fingerprint because this will be later used while connecting to the smartcenter through the GUI. The two fingerprints should match. This is a security feature.
The next step is reboot. Reboot the firewall.
Question 7 – What are the types of NAT and how to configure it in Check Point Firewall?
Answer:
Static Mode – manually defined
Answer:
Static Mode – manually defined

Friday, September 24, 2010
Configuring HSRP Protocol

I spent a little time this morning learning about the HSRP (Hot Standby Router Protocol) and how to configure it in a real world environment. This is something that I might think about implementing in our networking system actually. It works by creating redundancy between two routers in case one router loses internet connectivity, the other router can take over. The configuration was rather simple and easy to understand. You're basically creating a virtual IP (VIP) that your internal network will use rather than the routers actual Ethernet IP address. I have including a sample configuration below:
Router_A#sh run int fa0/0
Building configuration...
Current configuration : 166 bytes
!
interface FastEthernet0/0
ip address 192.168.100.2 255.255.255.0 (actual IP address)
duplex auto
speed auto
standby ip 192.168.100.1 (VIP address configured on Router B as well)
standby preempt (Tells the router to try and become primary when circuit is back up)
standby track Serial0/0 10 (decrements HSRP priority, router with highest is primary router)
end
Network Attacks
Types of Attacks
- Structured attack
Come from hackers who are more highly motivated and technically competent. These people know system vulnerabilities and can understand and develop exploit code and scripts. They understand, develop, and use sophisticated hacking techniques to penetrate unsuspecting businesses. These groups are often involved with the major fraud and theft cases reported to law enforcement agencies.
- Unstructured attack
Consists of mostly inexperienced individuals using easily available hacking tools such as shell scripts and password crackers. Even unstructured threats that are only executed with the intent of testing and challenging a hacker’s skills can still do serious damage to a company.
- External attacks
Initiated by individuals or groups working outside of a company. They do not have authorized access to the computer systems or network. They gather information in order to work their way into a network mainly from the Internet or dialup access servers.
- Internal attacks
More common and dangerous. Internal attacks are initiated by someone who has authorized access to the network. According to the FBI, internal access and misuse account for 60 to 80 percent of reported incidents. These attacks often are traced to disgruntled employees.
- Passive Attack
-Listen to system passwords
-Release of message content
-Traffic analysis
-Data capturing
- Active Attack
-Attempt to log into someone else’s account
-Wire taps
-Denial of services
-Masquerading
-Message modifications
Specific Network Attacks 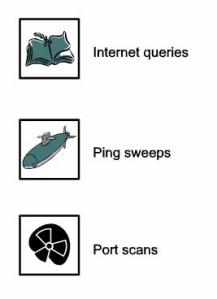
- ARP Attack
- Brute Force Attack
- Worms
- Flooding
- Sniffers
- Spoofing
- Redirected Attacks
- Tunneling Attack
- Covert Channels
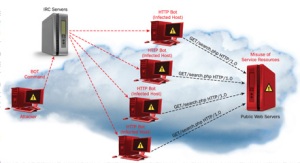
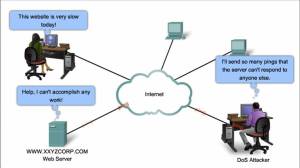
Denial-of-Service Facts
• Commonly used against information stores like web sites .
• Simple and usually quite effective .
• Does not pose a direct threat to sensitive data .
• The attacker tries to prevent a service from being used and making that service unavailable to legitimate users .
• Attackers typically go for high visibility targets such as the web server, or for infrastructure targets like routers and network links .
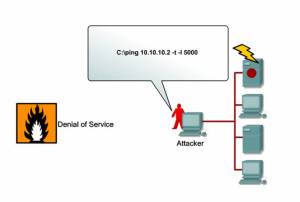
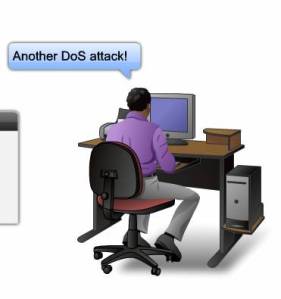
Denial-of-Service Example :
If a mail server is capable of receiving and delivering 10 messages a second, an attacker simply sends 20 messages per second. The legitimate traffic (as well as a lot of the malicious traffic) will get dropped, or the mail server might stop responding entirely.
- This type of an attack may be used as a diversion while another attack is made to actually compromise systems
- In addition, administrators are likely to make mistakes during an attack and possibly change a setting that creates a vulnerability that can be further exploited
Types of Denial-of-Service Attacks
SYN Flood Attack
Teardrop Attacks
Smurf Attack
DNS Attacks
Email Attacks
Physical Infrastructure Attacks
Viruses/Worms
- DoS – Buffer Overflow Attacks
The most common DoS attack sends more traffic to a device than the program anticipates that someone might send Buffer Overflow.
- DoS – SYN Flood Attack • When connection sessions are initiated between a client and server in a network, a very small space exists to handle the usually rapid “hand-shaking” exchange of messages that sets up a session.• The session-establishing packets include a SYN field that identifies the sequence order.• To cause this kind of attack, an attacker can send many packets, usually from a spoofed address, thus ensuring that no response is sent.
- DoS – Teardrop Attack
- Exploits the way that the Internet Protocol (IP) requires a packet that is too large for the next router to handle be divided into fragments.• The fragmented packet identifies an offset to the beginning of the first packet that enables the entire packet to be reassembled by the receiving system.• In the teardrop attack, an attacker’s IP puts a confusing value in the second or later fragment. If the receiving operating system cannot cope with such fragmentation, then it can cause the system to crash.
- DoS – Smurf Attack
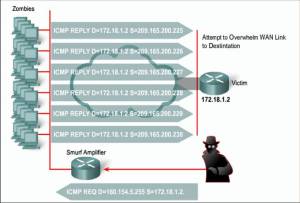
- The attacker sends an IP ping
request to a network site.The ping packet requests that it
be broadcast to a number of hosts
within that local network.The packet also indicates that the
request is from a different site, i.e.
the victim site that is to receive the
denial of service.This is called IP Spoofing–the victim site becomes the address of the originating packet.The result is that lots of ping replies flood back to the victim host. If the flood is big enough then the victim host will no longer be able to receive or process “real” traffic.
- DoS – DNS Attacks
 • A famous DNS attack was
a DDoS “ping” attack. The
attackers broke into
machines on the Internet
(popularly called “zombies”)
and sent streams of forged
packets at the 13 DNS
root servers via intermediary
legitimate machines.• The goal was to clog the servers, and communication links on the way to the servers, so that useful traffic was gridlocked. The assault is not DNS-specific–the same attack has been used against several popular Web servers in the last few years.
- DoS – Email Attacks
 • When using Microsoft Outlook, a script reads your address book and sends a copy of itself to everyone listed there, thus propagating itself around the Internet.• The script then modifies the computer’s registry so that the script runs itself again when restarted.
- DoS – Physical Infrastructure Attacks • Someone can just simply snip your cables! Fortunately this can be quickly noticed and dealt with.• Other physical infrastructure attacks can include recycling systems, affecting power to systems and actual destruction of computers or storage devices.
- DoS – Viruses/Worms
 • Viruses or worms, which replicate across a network in various ways, can be viewed as denial-of-service attacks where the victim is not usually specifically targeted but simply a host unlucky enough to get the virus.• Available bandwidth can become saturated as the virus/worm attempts to replicate itself and find new victims.
- Malicious Code Attacks
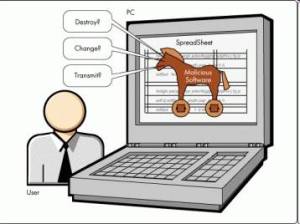 • Malicious code attacks refers to viruses, worms, Trojan horses, logic bombs, and other uninvited software• Damages personal computers, but also attacks systems that are more sophisticated• Actual costs attributed to the presence of malicious code have resulted primarily from system outages and staff time involved in repairing the systems• Costs can be significant
- Packet Sniffing Attacks
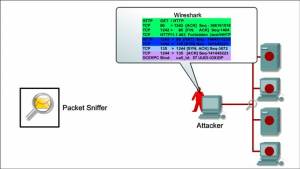 • Most organization LANs are Ethernet networks• On Ethernet-based networks, any machine on the network can see the traffic for every machine on that network• Sniffer programs exploit this characteristic, monitoring all traffic and capturing the first 128 bytes or so of every unencrypted FTP or Telnet session (the part that contains user passwords) .
- Information Leakage Attacks • Attackers can sometimes get data without having to directly use computers• Exploit Internet services that are intended to give out information• Induce these services to reveal extra information or to give it out to unauthorized people• Many services designed for use on local area networks do not have the security needed for safe use across the Internet• Thus these services become the means for important information leakage
- Social Engineering Attacks • Hacker-speak for tricking a person into revealing some confidential information• Social Engineering is defined as an attack based on deceiving users or administrators at the target site• Done to gain illicit access to systems or useful information• The goals of social engineering are fraud, network intrusion, industrial espionage, identity theft, etc.
Attack Methodology
- Stages – the methodology of network attacks is well documented and researched. This research has led to greater understanding of network attacks and an entire specialization of engineers that test and protect networks against attacks (Certified Ethical Hackers/Penetration Testers)
- Tools – penetration testers have a variety of power tools that are now commercially available. They also have may open source free tools. This proliferation of powerful tools has increased the threat of attack due to the fact that even technical novices can now launch sophisticated attacks.
Stages of an Attack
• Today’s attackers have a abundance of targets. In fact their greatest challenge is to select the most vulnerable victims. This has resulted in very well- planned and structured attacks. These attacks have common logistical and strategic stages. These stages include;
-Reconnaissance
-Scanning (addresses, ports, vulnerabilities)
-Gaining access
-Maintaining Access
-Covering Tracks
Tools of the Attacker
• The following are a few of the most popular tools used by network attackers:
-Enumeration tools (dumpreg, netview and netuser)
-Port/address scanners (AngryIP, nmap, Nessus)
-Vulnerability scanners (Meta Sploit, Core Impact, ISS)
-Packet Sniffers (Snort, Wire Shark, Air Magnet)
-Cryptographic cracking tools (Cain, WepCrack)
-Malicious codes (worms, Trojan horse, time bombs)
-System hijack tools (netcat, MetaSploit, Core Impact)
How to read Cisco FastEthernet Interface status
Sometimes, by looking over some basic or fundamental information during troubleshooting, we got wrong path and wasted hack of time. If you carefully reviewed interface status, you might easily guess what the root of issue. At least some of clue from there. Understanding interface status is very important step on your troubleshooting path.

Here is simple guide how to read and understand status of FastEthernet interface on Cisco router.
FastEthernet0/0 is up
Indicates the interface hardware is currently active
Line protocol is up
Indicates the software processes that handle the line protocol consider the line usable.
MTU 1500 bytes
Maximum Transmission Unit of the interface.
BW 100000 Kbit
Bandwidth of the interface in kilobits per second. It can be changed by "bandwidth" command
DLY 100 usec
Delay of the interface in microseconds.
reliability 255/255
Reliability of the interface as a fraction of 255 (255/255 is 100% reliability), calculated as an exponential average. If layer 1 or 2 are having an issue, it brings down reliability number. For example; 236/255.
txload 1/255, rxload 1/255
Load on the interface as a fraction of 255 (255/255 is completely saturated). The number is calculated based on bandwidth setting by 'bandwidth' command.
Encapsulation ARPA
Encapsulation method assigned to interface.
Keepalive set (10 sec)
Sending keepalive packet in 10 sec to maintain link.
Full-duplex, 100Mb/s, 100BaseTX/FX
Speed, Data Speed, and Wire Type; Very important indications to troubleshooting
Last clearing of "show interface" counters 00:00:02
self-explanatory; indicated when was last cleared interface. It is important to know when interface took errors.
Queueing strategy: fifo
First In, First Out queuing strategy.
Output queue 0/40, 0 drops; input queue 0/75, 0 drops
Number of packets in output and input queues. If link is heavily congested, output drops will be increased.
30 minute input rate 624000 bits/sec, 254 packets/sec
30 minute output rate 571000 bits/sec, 231 packets/sec
Average number of bits and packets transmitted per second in the last 30 minutes.
Default is 5 minutes. To change 30 seconds interval, use "load-interval" commands at interface level.
runts
While CRC is correct, number of packets that are discarded because they are smaller than the medium's minimum packet size. For instance, any Ethernet packet that is less than 64 bytes is considered a runt.
giants(Jabber)
While CRC is corect, number of packets that are discarded because they exceed the medium's maximum packet size. For example, any Ethernet packet that is greater than 1,518 bytes is considered a giant.
input errors
Total # of errors. It includes runts, giants, no buffer, CRC, frame, overrun, and ignored counts.
CRC
Cyclic Redundancy Checksum errors are generated by the far-end device does not match the checksum calculated from the data received. It is normally caused by physical layer issues, configuration(duplex) mis-matching and heavy collision on the Ethernet segment.
frame
Number of packets received incorrectly having a CRC error and abnormal frame structure.
overrun
Number of times the receiver hardware was unable to hand received data to a hardware buffer because the input rate exceeded the receiver's ability to handle the data. If the number is increasing, quickly check cpu utilization by using "show processes cpu". Most of time, CPU utilization would be higher than 80~90%.
ignored
Number of received packets ignored by the interface because the interface hardware ran low on internal buffers.
watchdog
Number of times watchdog receive timer expired. It happens when receiving a packet with length greater than 2048.
input packets with dribble condition detected
Dribble bit error indicates that a frame is slightly too long. This frame error counter is incremented just for informational purposes; the router accepts the frame.
packets output
Total number of messages transmitted
bytes
Total number of bytes, including data and MAC encapsulation, transmitted by the system.
underruns
Number of times that the transmitter has been running faster than the router can handle. This may never be reported on some interfaces.
output errors
Sum of all errors that prevented the final transmission of datagrams out of the interface being examined. Note that this may not balance with the sum of the enumerated output errors.
collisions
Number of messages retransmitted due to an Ethernet collision. This is usually caused by an overextended LAN, more than two repeaters between stations or too many cascaded multiport transceivers. Some rare cases, mis-matching duplex setting caused collisions as well. If both side hard coded full duplex, collisions counters will remain zero(0).
interface resets
Number of times an interface has been completely reset. This can happen if packets queued for transmission were not sent within several seconds.
babbles
The transmit jabber timer expired.
late collision
Jam signal couldn't reach to ends. It happens, when the network is too big, distance issue between nodes or faulty devices It caused unnecessary traffic on the network.
deferred
Deferred counter implies that the chip had to defer while ready to transmit a frame because the carrier was asserted.
lost carrier
Number of times the carrier was lost during transmission.
no carrier
Number of times the carrier was not present during the transmission.
output buffer failures
Number of no resource errors received on the output.
output buffers swapped out
Number of packets swapped to DRAM.
Thursday, September 23, 2010
Make a shorcut of any cisco ios command
The ‘alias’ configuration command allows you to create aliases for just about any command or command string that you would like to run. For example, you may find yourself running the ‘show ip route’ command in privileged mode quite often. With the ‘alias’ command you can create an alias for that command string. For example:
Router(config)#alias [privilege level where to be executed] [the alias you want to use] the command string the alias is to execute
As you can see now when I type ‘sir’ it will now run the ‘show ip route’ command:
Router(config)#alias [privilege level where to be executed] [the alias you want to use] the command string the alias is to execute
As you can see now when I type ‘sir’ it will now run the ‘show ip route’ command:
Router(config)#alias exec sir show ip route
Router#sir
Codes: C - connected, S - static, I - IGRP, R - RIP, M - mobile, B – BGP
       D - EIGRP, EX - EIGRP external, O - OSPF, IA - OSPF inter area
       N1 - OSPF NSSA external type 1, N2 - OSPF NSSA external type 2
       E1 - OSPF external type 1, E2 - OSPF external type 2, E – EGP
       i - IS-IS, su - IS-IS summary, L1 - IS-IS level-1, L2 - IS-IS level-2
       ia - IS-IS inter area, * - candidate default, U - per-user static route
       o - ODR, P - periodic downloaded static route
Gateway of last resort is 10.0.0.1 to network 0.0.0.0
{TRUNCATED}
Checkpoint Interview questions
Before going to start i suggest you that never try to make fool to your interviewer.
1)From which was the first version of Checkpoint you worked?
2)What is the difference between CP NG and CP NGX?
3)In how many mode we can install the checkpoint?
4)What is architecture of Checkpoint?
5)What is SIC ?
6)What is NAT and how many type of NAT supported by CP explain ?
7)What is the unicast and multicast?
8)What is the rules define Stealth and Clean up rule ?
9)Can we configure rules above stealth rule?
10)What is the purpose of clean up rule ?
11)How you can configure smart view client in new pc?
12)How you are taking backup of CP?
13)How you can take manual backup and which folders are necessary ?
14)How you can configure Log server and where in CP we configure it?
15)How you use smart view tracker tell about three pannes of it.
16)Have you ever configure smart defence if yes tell us the few feature of it.
17)What are the important communication ports of the checkpoint ?
18)Tell me about licence part of the CP and types of it.
19)How you can integrate gateway boxes with CP like Nokia and Nortel or UTM boxes?
20)How you can bring up Nokia box integration with CP server.
21)Have you configure Cluster in CP if yes then tell us process?
22)What is VRRP?
23)What is FW monitor ?
24)Try to give 5 important CLI commands which are helpful for CP admin ?
25)Have you done CCSA if yes then what is the career path for it and how many question were there .
26)What is Bi directional NAT?
27)If log folder is crossed the threshold value which you had defined in CP server then what will happen?
28)What is the use of database revision control?
29)Have you ever configure VPN if yes then tell us about Site to Site with IPSEC in CP?
30)Have you ever upgrade the R60 to R62 or R65 if yes then tell us the process?
31)What is FW unloadlocal
32)If log tracker is showing green means accepted even though defined rule is not working then what causes might be tell us.?
33)What is SYNC in cluster ?
35)What is statefull inspection technology ?
36)Apart from Statefull which other technology firewall belongs too?
37)Difference between ASA and Checkpoint firewall?
38)What is ICMP default setting in global properties of CP?
39)How you can reconfigure SIC password ?
40)If you restarted the remote gateway then what will happen in CP network ?
Wednesday, September 22, 2010
Making IP-address and default gateway in Qemu permanent
By default when added using ifconfig and route commands IP-address and default gateway do not remain during reboot.
- To make settings persistent do following:
sudo su
vi /opt/bootlocal.sh
- Add follwing lines to the file:
hostname Qemu1
ifconfig eth0 10.10.10.2/24
route add default gw 10.10.10.1
- Save file:
- Press Esc
- Type :wq!
- Run following command:
/usr/bin/filetool.sh backup
Now you can reboot the router and settings will remain.
Tuesday, September 21, 2010
Severity levels
| Level | Name | Level | Name |
|---|---|---|---|
| 0 | Emergencies | 4 | Warnings |
| 1 | Alerts | 5 | Notifications |
| 2 | Critical | 6 | Informational |
| 3 | Errors | 7 | Debugging |
Subscribe to:
Posts (Atom)
